导航栏和状态栏都是通过WindowManager直接添加的View,他们一般称为装饰窗口。下面来看导航栏的创建过程。 回到之前的PhoneStatusBar中的makeStatusBarView函数中:
        try {
            boolean showNav = mWindowManagerService.hasNavigationBar();
            if (DEBUG) Log.v(TAG, "hasNavigationBar=" + showNav);
            if (showNav) {
                createNavigationBarView(context);
            }
        } catch (RemoteException ex) {
            // no window manager? good luck with that
        }
首先判断是否支持虚拟按键,判断条件逻辑在PhoneWindowManager中:
        mHasNavigationBar = res.getBoolean(com.android.internal.R.bool.config_showNavigationBar);

        // Allow a system property to override this. Used by the emulator.
        // See also hasNavigationBar().
        String navBarOverride = SystemProperties.get("qemu.hw.mainkeys");
        if ("1".equals(navBarOverride)) {
            mHasNavigationBar = false;
        } else if ("0".equals(navBarOverride)) {
            mHasNavigationBar = true;
        }
决定是否显示为qemu.hw.mainkeys实体按键属性。如果支持的话,则调用createNavigationBarView创建导航栏控件树:
    protected void createNavigationBarView(Context context) {
        inflateNavigationBarView(context);
        mNavigationBarView.setDisabledFlags(mDisabled1);
        ......
    }
mNavigationBarView.setDisabledFlags(mDisabled1)是设置导航栏中各按键是否可见flag。 重点来看inflateNavigationBarView:
    protected void inflateNavigationBarView(Context context) {
        mNavigationBarView = (NavigationBarView) View.inflate(
                context, R.layout.navigation_bar, null);
    }
该函数加载创建了一个NavigationBarView类型的布局navigation_bar.xml:
<com.android.systemui.statusbar.phone.NavigationBarView
    xmlns:android="http://schemas.android.com/apk/res/android"
    xmlns:systemui="http://schemas.android.com/apk/res-auto"
    android:layout_height="match_parent"
    android:layout_width="match_parent"
    android:background="@drawable/system_bar_background">

    <com.android.systemui.statusbar.phone.NavigationBarInflaterView
        android:id="@+id/navigation_inflater"
           android:layout_width="match_parent"
        android:layout_height="match_parent" />

</com.android.systemui.statusbar.phone.NavigationBarView>
该布局中包含一个定义布局NavigationBarInflaterView。下面重点介绍一下这两个自定义布局NavigationBarView和NavigationBarInflaterView。 首先来看NavigationBarView的创建函数:
    public NavigationBarView(Context context, AttributeSet attrs) {
        .......
        updateIcons(context, Confi  guration.EMPTY, mConfiguration);

        mBarTransitions = new NavigationBarTransitions(this);

        mButtonDisatchers.put(R.id.back, new ButtonDispatcher(R.id.back));
        mButtonDisatchers.put(R.id.home, new ButtonDispatcher(R.id.home));
        mButtonDisatchers.put(R.id.recent_apps, new ButtonDispatcher(R.id.recent_apps));
        mButtonDisatchers.put(R.id.menu, new ButtonDispatcher(R.id.menu));
        mButtonDisatchers.put(R.id.ime_switcher, new ButtonDispatcher(R.id.ime_switcher));
    }
updateIcons主要是初识化导航栏中各个按键的图标。 这里的初始化涉及到了ButtonDisatchers类,这个类是用于处理多个具有相同操作的虚拟按键设置。如设置图片、设置click和touch事件等。
再来看NavigationBarView的onFinishInflate函数:
    public void onFinishInflate() {
        mNavigationInflaterView = (NavigationBarInflaterView) findViewById(
                R.id.navigation_inflater);
        updateRotatedViews();
        mNavigationInflaterView.setButtonDispatchers(mButtonDisatchers);
        ......
    }
其主要创建加载了NavigationBarInflaterView布局,先来看其创建和加载函数:
    public NavigationBarInflaterView(Context context, AttributeSet attrs) {
        super(context, attrs);
        mDensity = context.getResources().getConfiguration().densityDpi;
        createInflaters();
    }
创建函数中主要获取了屏幕密度和初始化布局加载器。 再看加载函数:
    @Override
    protected void onFinishInflate() {
        super.onFinishInflate();
        inflateChildren();
        clearViews();
        inflateLayout(getDefaultLayout());
    }
首先看inflateChildren的实现:
    private void inflateChildren() {
        removeAllViews();
        mRot0 = (FrameLayout) mLayoutInflater.inflate(R.layout.navigation_layout, this, false);
        mRot0.setId(R.id.rot0);
        addView(mRot0);
        mRot90 = (FrameLayout) mLayoutInflater.inflate(R.layout.navigation_layout_rot90, this,
                false);
        mRot90.setId(R.id.rot90);
        addView(mRot90);
        updateAlternativeOrder();
        if (getParent() instanceof NavigationBarView) {
            ((NavigationBarView) getParent()).updateRotatedViews();
        }
    }
可以看到添加了两个布局navigation_layout和navigation_layout_rot90,这两个布局分别代表水平方式和垂直方式的导航栏布局,以navigation_layout为例:
<FrameLayout
    xmlns:android="http://schemas.android.com/apk/res/android"
    xmlns:systemui="http://schemas.android.com/apk/res-auto"
    android:layout_width="match_parent"
    android:layout_height="match_parent">

    <FrameLayout
        android:id="@+id/nav_buttons"
        android:layout_width="match_parent"
        android:layout_height="match_parent">

        <LinearLayout
            android:id="@+id/ends_group"
            android:layout_width="match_parent"
            android:layout_height="match_parent"
            android:orientation="horizontal"
            android:clipChildren="false" />

        <LinearLayout
            android:id="@+id/center_group"
            android:layout_width="match_parent"
            android:layout_height="match_parent"
            android:gravity="center"
            android:orientation="horizontal"
            android:clipChildren="false" />

    </FrameLayout>

    <com.android.systemui.statusbar.policy.DeadZone
        android:id="@+id/deadzone"
        android:layout_height="match_parent"
        android:layout_width="match_parent"
        android:layout_gravity="top"
        systemui:minSize="@dimen/navigation_bar_deadzone_size"
        systemui:maxSize="@dimen/navigation_bar_deadzone_size_max"
        systemui:holdTime="@integer/navigation_bar_deadzone_hold"
        systemui:decayTime="@integer/navigation_bar_deadzone_decay"
        systemui:orientation="horizontal"
        />

</FrameLayout>
主要包括了nav_buttons和deadzone,nav_buttons即包含了虚拟按键子控件,子控件以ends_group和center_group布局加载,后面会详细介绍具体的子控件加载。navigation_layout_rot90和其唯一的区别在在于ends_group和center_group使用的是ReverseLinearLayout,这个布局可以自动反转子view添加的顺序,还可以反转布局参数的宽度和高度值。 deadzone是一个DeadZone类型的控件,覆盖在其他所有控件之上。这个类主要是为了避免用户误操作,其会将导航栏边缘的触摸事件当做用户误操作消费掉。
再来看updateRotatedViews的实现:
    void updateRotatedViews() {
        mRotatedViews[Surface.ROTATION_0] =
                mRotatedViews[Surface.ROTATION_180] = findViewById(R.id.rot0);
        mRotatedViews[Surface.ROTATION_270] =
                mRotatedViews[Surface.ROTATION_90] = findViewById(R.id.rot90);

        updateCurrentView();
    }
可以看到水平方向使用的是rot0,垂直方向使用的rot90的布局,再看updateCurrentView的实现:
    private void updateCurrentView() {
        final int rot = mDisplay.getRotation();
        for (int i=0; i<4; i++) {
            mRotatedViews[i].setVisibility(View.GONE);
        }
        mCurrentView = mRotatedViews[rot];
        mCurrentView.setVisibility(View.VISIBLE);
        mNavigationInflaterView.setAlternativeOrder(rot == Surface.ROTATION_90);
        for (int i = 0; i < mButtonDisatchers.size(); i++) {
            mButtonDisatchers.valueAt(i).setCurrentView(mCurrentView);
        }
        updateLayoutTransitionsEnabled();
        mCurrentRotation = rot;
    }
可以看到该函数获取了当前的旋转方向,然后选择相应的布局显示。
然后回到onFinishInflate,初始化好相应布局后,调用clearViews清除布局的相应子view,然后调用inflateLayout设置布局的相关控件,来看其实现:
    protected void inflateLayout(String newLayout) {
        mCurrentLayout = newLayout;
        if (newLayout == null) {
            newLayout = getDefaultLayout();
        }
        String[] sets = newLayout.split(GRAVITY_SEPARATOR, 3);
        String[] start = sets[0].split(BUTTON_SEPARATOR);
        String[] center = sets[1].split(BUTTON_SEPARATOR);
        String[] end = sets[2].split(BUTTON_SEPARATOR);
        // Inflate these in start to end order or accessibility traversal will be messed up.
        inflateButtons(start, (ViewGroup) mRot0.findViewById(R.id.ends_group), false);
        inflateButtons(start, (ViewGroup) mRot90.findViewById(R.id.ends_group), true);

        inflateButtons(center, (ViewGroup) mRot0.findViewById(R.id.center_group), false);
        inflateButtons(center, (ViewGroup) mRot90.findViewById(R.id.center_group), true);

        addGravitySpacer((LinearLayout) mRot0.findViewById(R.id.ends_group));
        addGravitySpacer((LinearLayout) mRot90.findViewById(R.id.ends_group));

        inflateButtons(end, (ViewGroup) mRot0.findViewById(R.id.ends_group), false);
        inflateButtons(end, (ViewGroup) mRot90.findViewById(R.id.ends_group), true);
    }
getDefaultLayout是获取一串定义的字符串:
<string name="config_navBarLayout" translatable="false">space,back;home;recent,menu_ime</string>
然后解析这一个字串并保存,这个字串其实就是设置三个虚拟按键可以显示的内容。其是通过inflateButton函数来实现的。来看实现:
    protected View inflateButton(String buttonSpec, ViewGroup parent, boolean landscape,
            int indexInParent) {
        LayoutInflater inflater = landscape ? mLandscapeInflater : mLayoutInflater;
        float size = extractSize(buttonSpec);
        String button = extractButton(buttonSpec);
        View v = null;
        if (HOME.equals(button)) {
            v = inflater.inflate(R.layout.home, parent, false);
            if (landscape && isSw600Dp()) {
                setupLandButton(v);
            }
        } else if (BACK.equals(button)) {
            v = inflater.inflate(R.layout.back, parent, false);
            if (landscape && isSw600Dp()) {
                setupLandButton(v);
            }
        } else if (RECENT.equals(button)) {
            v = inflater.inflate(R.layout.recent_apps, parent, false);
            if (landscape && isSw600Dp()) {
                setupLandButton(v);
            }
        } else if (MENU_IME.equals(button)) {
            v = inflater.inflate(R.layout.menu_ime, parent, false);
        } else if (NAVSPACE.equals(button)) {
            v = inflater.inflate(R.layout.nav_key_space, parent, false);
        } else if (CLIPBOARD.equals(button)) {
            v = inflater.inflate(R.layout.clipboard, parent, false);
        } else if (button.startsWith(KEY)) {
            String uri = extractImage(button);
            int code = extractKeycode(button);
            v = inflater.inflate(R.layout.custom_key, parent, false);
            ((KeyButtonView) v).setCode(code);
            if (uri != null) {
                ((KeyButtonView) v).loadAsync(uri);
            }
        } else {
            return null;
        }

        if (size != 0) {
            ViewGroup.LayoutParams params = v.getLayoutParams();
            params.width = (int) (params.width * size);
        }
        parent.addView(v);
        addToDispatchers(v, landscape);
        View lastView = landscape ? mLastRot90 : mLastRot0;
        if (lastView != null) {
            v.setAccessibilityTraversalAfter(lastView.getId());
        }
        if (landscape) {
            mLastRot90 = v;
        } else {
            mLastRot0 = v;
        }
        return v;
    }
可以看到根据相应的String设置不同的布局文件,以home为例,其加载的为home layout:
<com.android.systemui.statusbar.policy.KeyButtonView
    xmlns:android="http://schemas.android.com/apk/res/android"
    xmlns:systemui="http://schemas.android.com/apk/res-auto"
    android:id="@+id/home"
    android:layout_width="@dimen/navigation_key_width"
    android:layout_height="match_parent"
    android:layout_weight="0"
    android:src="@drawable/ic_sysbar_home"
    systemui:keyCode="3"
    android:scaleType="center"
    android:contentDescription="@string/accessibility_home"
    android:paddingStart="@dimen/navigation_key_padding"
    android:paddingEnd="@dimen/navigation_key_padding"
    />
其是一个KeyButtonView类型的子控件,KeyButtonView继承自ImageView,主要扩展的功能是根据派发给它的触摸事件转化为按键事件,并通过InputManager.injectInputEvent方法将按键事件注入到InputDispatcher的派发队列中,模拟按键输入。 在KeyButtonView中比较重要的字段为mCode和mSupportsLongpress,表示按键事件的键值和是否产生按键的长按事件,这两个值的定义是通过自定义控件的属性keyCode和keyRepeat设置的,但是长按事件在这里都没有设置,长按事件的处理都是通过设置相关监听事件,后面会介绍。如下为代码分析:
    <declare-styleable name="KeyButtonView">
        <!-- key code to send when pressed; if absent or 0, no key is sent -->
        <attr name="keyCode" format="integer" />
        <!-- does this button generate longpress / repeat events? -->
        <attr name="keyRepeat" format="boolean" />
        <attr name="android:contentDescription" />
    </declare-styleable>
这是属性的定义,在上面的 systemui:keyCode=”3”即为设置Home的键值。下面来看KeyButtonView中的处理,首先是初始化:
    public KeyButtonView(Context context, AttributeSet attrs, int defStyle) {
        super(context, attrs);

        TypedArray a = context.obtainStyledAttributes(attrs, R.styleable.KeyButtonView,
                defStyle, 0);

        mCode = a.getInteger(R.styleable.KeyButtonView_keyCode, 0);

        mSupportsLongpress = a.getBoolean(R.styleable.KeyButtonView_keyRepeat, true);
        ......
        setClickable(true);
        ......
        setBackground(new KeyButtonRipple(context, this));
    }
可以看到,首先获取定义的键值和是否支持长按,并设置为可点击和背景。下面看OnTouch事件处理:
    public boolean onTouchEvent(MotionEvent ev) {
        ......
        switch (action) {
            case MotionEvent.ACTION_DOWN:
                setPressed(true);
                ......
                if (mCode != 0) {
                    sendEvent(KeyEvent.ACTION_DOWN, 0, mDownTime);
                }
                ......
                postDelayed(mCheckLongPress, ViewConfiguration.getLongPressTimeout());
            ......
            case MotionEvent.ACTION_CANCEL:
                setPressed(false);
                if (mCode != 0) {
                    sendEvent(KeyEvent.ACTION_UP, KeyEvent.FLAG_CANCELED);
                }
                removeCallbacks(mCheckLongPress);
            case MotionEvent.ACTION_UP:
                final boolean doIt = isPressed() && !mLongClicked;
                setPressed(false);
                if (mCode != 0) {
                    if (doIt) {
                        sendEvent(KeyEvent.ACTION_UP, 0);
                        sendAccessibilityEvent(AccessibilityEvent.TYPE_VIEW_CLICKED);
                    } else {
                        sendEvent(KeyEvent.ACTION_UP, KeyEvent.FLAG_CANCELED);
                    }
                } else {
                    // no key code, just a regular ImageView
                    if (doIt && mOnClickListener != null) {
                        mOnClickListener.onClick(this);
                        sendAccessibilityEvent(AccessibilityEvent.TYPE_VIEW_CLICKED);
                    }
                }
                removeCallbacks(mCheckLongPress);
                break;
        }

        return true;
    }
    private final Runnable mCheckLongPress = new Runnable() {
        public void run() {
            if (isPressed()) {
                // Log.d("KeyButtonView", "longpressed: " + this);
                if (isLongClickable()) {
                    // Just an old-fashioned ImageView
                    performLongClick();
                    mLongClicked = true;
                } else if (mSupportsLongpress) {
                    sendEvent(KeyEvent.ACTION_DOWN, KeyEvent.FLAG_LONG_PRESS);
                    sendAccessibilityEvent(AccessibilityEvent.TYPE_VIEW_LONG_CLICKED);
                    mLongClicked = true;
                }
            }
        }
    };
可以看到,不管是按键还是长按事件,最终都会调用sendEvent发送相应的事件,下面来看其实现:
    void sendEvent(int action, int flags, long when) {
        final int repeatCount = (flags & KeyEvent.FLAG_LONG_PRESS) != 0 ? 1 : 0;
        final KeyEvent ev = new KeyEvent(mDownTime, when, action, mCode, repeatCount,
                0, KeyCharacterMap.VIRTUAL_KEYBOARD, 0,
                flags | KeyEvent.FLAG_FROM_SYSTEM | KeyEvent.FLAG_VIRTUAL_HARD_KEY,
                InputDevice.SOURCE_KEYBOARD);
        InputManager.getInstance().injectInputEvent(ev,
                InputManager.INJECT_INPUT_EVENT_MODE_ASYNC);
    }
可以看到最后是通过InputManager.injectInputEvent将keyEvent加入到InputDispatcher的派发队列,模式按键的输入事件。 总结一下: 如设置了keyCode,则通过OnTouchEvent完成从触摸事件到按键事件的映射,在通过SendEvent完成按键事件的创建与发送。 如没有设置KeyCode,则触发监听器OnClickListener,执行对应的处理函数。
到这里,布局的创建基本已经完成,但是具体的按键图标还未设置,前面的NavigationBarView的初始化中,updateIcons只是获取了相关的图标资源,并未设置到具体的控件中,下面就接着来看。 回到PhoneStatusBar的Start函数中,在执行完super.start()后,紧着着执行的是addNavigationBar()函数,我们来看其实现:
    protected void addNavigationBar() {
        if (DEBUG) Log.v(TAG, "addNavigationBar: about to add " + mNavigationBarView);
        if (mNavigationBarView == null) return;

        try {
            WindowManagerGlobal.getWindowManagerService()
                    .watchRotation(new IRotationWatcher.Stub() {
                @Override
                public void onRotationChanged(final int rotation) throws RemoteException {
                    // We need this to be scheduled as early as possible to beat the redrawing of
                    // window in response to the orientation change.
                    Message msg = Message.obtain(mHandler, new Runnable() {
                        @Override
                        public void run() {
                            if (mNavigationBarView != null
                                    && mNavigationBarView.needsReorient(rotation)) {
                                repositionNavigationBar();
                            }
                        }
                    });
                    msg.setAsynchronous(true);
                    mHandler.sendMessageAtFrontOfQueue(msg);
                }
            });
        } catch (RemoteException e) {
            throw e.rethrowFromSystemServer();
        }

        prepareNavigationBarView();

        mWindowManager.addView(mNavigationBarView, getNavigationBarLayoutParams());
首先注册了一个方向变化的监听,用于在变化时及时更新。 下面的prepareNavigationBarView和mWindowManager.addView是初始化的重点函数。 先来看prepareNavigationBarView:
    private void prepareNavigationBarView() {
        mNavigationBarView.reorient();

        ButtonDispatcher recentsButton = mNavigationBarView.getRecentsButton();
        recentsButton.setOnClickListener(mRecentsClickListener);
        recentsButton.setOnTouchListener(mRecentsPreloadOnTouchListener);
        recentsButton.setLongClickable(true);
        recentsButton.setOnLongClickListener(mRecentsLongClickListener);

        ButtonDispatcher backButton = mNavigationBarView.getBackButton();
        backButton.setLongClickable(true);
        backButton.setOnLongClickListener(mLongPressBackListener);

        ButtonDispatcher homeButton = mNavigationBarView.getHomeButton();
        homeButton.setOnTouchListener(mHomeActionListener);
        homeButton.setOnLongClickListener(mLongPressHomeListener);

        mAssistManager.onConfigurationChanged();
    }
看NavigationBarView中reorient的实现:
    public void reorient() {
        updateCurrentView();

        getImeSwitchButton().setOnClickListener(mImeSwitcherClickListener);

        mDeadZone = (DeadZone) mCurrentView.findViewById(R.id.deadzone);

        // force the low profile & disabled states into compliance
        mBarTransitions.init();
        setDisabledFlags(mDisabledFlags, true /* force */);
        setMenuVisibility(mShowMenu, true /* force */);

        if (DEBUG) {
            Log.d(TAG, "reorient(): rot=" + mCurrentRotation);
        }

        updateTaskSwitchHelper();
        setNavigationIconHints(mNavigationIconHints, true);
    }
主要是更新水平or垂直布局,并设置是否弹出输入法的相关显示即监听事件,最后是setNavigationIconHints函数,我们来看这里面的实现:
    public void setNavigationIconHints(int hints, boolean force) {
        if (!force && hints == mNavigationIconHints) return;
        final boolean backAlt = (hints & StatusBarManager.NAVIGATION_HINT_BACK_ALT) != 0;
        if ((mNavigationIconHints & StatusBarManager.NAVIGATION_HINT_BACK_ALT) != 0 && !backAlt) {
            mTransitionListener.onBackAltCleared();
        }
        if (DEBUG) {
            android.widget.Toast.makeText(getContext(),
                "Navigation icon hints = " + hints,
                500).show();
        }

        mNavigationIconHints = hints;

        // We have to replace or restore the back and home button icons when exiting or entering
        // carmode, respectively. Recents are not available in CarMode in nav bar so change
        // to recent icon is not required.
        Drawable backIcon = (backAlt)
                ? getBackIconWithAlt(mUseCarModeUi, mVertical)
                : getBackIcon(mUseCarModeUi, mVertical);

        getBackButton().setImageDrawable(backIcon);

        updateRecentsIcon();

        if (mUseCarModeUi) {
            getHomeButton().setImageDrawable(mHomeCarModeIcon);
        } else {
            getHomeButton().setImageDrawable(mHomeDefaultIcon);
        }

        final boolean showImeButton = ((hints & StatusBarManager.NAVIGATION_HINT_IME_SHOWN) != 0);
        getImeSwitchButton().setVisibility(showImeButton ? View.VISIBLE : View.INVISIBLE);
        getImeSwitchButton().setImageDrawable(mImeIcon);

        // Update menu button in case the IME state has changed.
        setMenuVisibility(mShowMenu, true);
        getMenuButton().setImageDrawable(mMenuIcon);

        setDisabledFlags(mDisabledFlags, true);
可以看到这个函数就是将具体的图标资源设置到相关的控件中。
回到前面prepareNavigationBarView中,执行完reorient后,获取了相关的button并设置了相关按键事件的监听,包括点击和长按。前面提到,对于设置了KeyCode的keyButtonView(home、back),则在KeyButtonView中会解析并发送相应的按键事件,而对于未设置的(recent),则是在这里设置相应的click事件。对于长按事件,三个按键都是在这里设置。
在回到addNavigationBar中,执行完prepareNavigationBarView后,则控件树和资源都基本已加载完,就剩最后一步,将控件树加载到Window中,即mWindowManager.addView,其中相关的添加参数在getNavigationBarLayoutParams中:
    private WindowManager.LayoutParams getNavigationBarLayoutParams() {
        WindowManager.LayoutParams lp = new WindowManager.LayoutParams(
                LayoutParams.MATCH_PARENT, LayoutParams.MATCH_PARENT,
                WindowManager.LayoutParams.TYPE_NAVIGATION_BAR,
                    0
                    | WindowManager.LayoutParams.FLAG_TOUCHABLE_WHEN_WAKING
                    | WindowManager.LayoutParams.FLAG_NOT_FOCUSABLE
                    | WindowManager.LayoutParams.FLAG_NOT_TOUCH_MODAL
                    | WindowManager.LayoutParams.FLAG_WATCH_OUTSIDE_TOUCH
                    | WindowManager.LayoutParams.FLAG_SPLIT_TOUCH
                    | WindowManager.LayoutParams.FLAG_SLIPPERY,
                PixelFormat.TRANSLUCENT);
        // this will allow the navbar to run in an overlay on devices that support this
        if (ActivityManager.isHighEndGfx()) {
            lp.flags |= WindowManager.LayoutParams.FLAG_HARDWARE_ACCELERATED;
        }

        lp.setTitle("NavigationBar");
        lp.windowAnimations = 0;
        return lp;
    }
至此,导航栏就已经添加创建完毕。
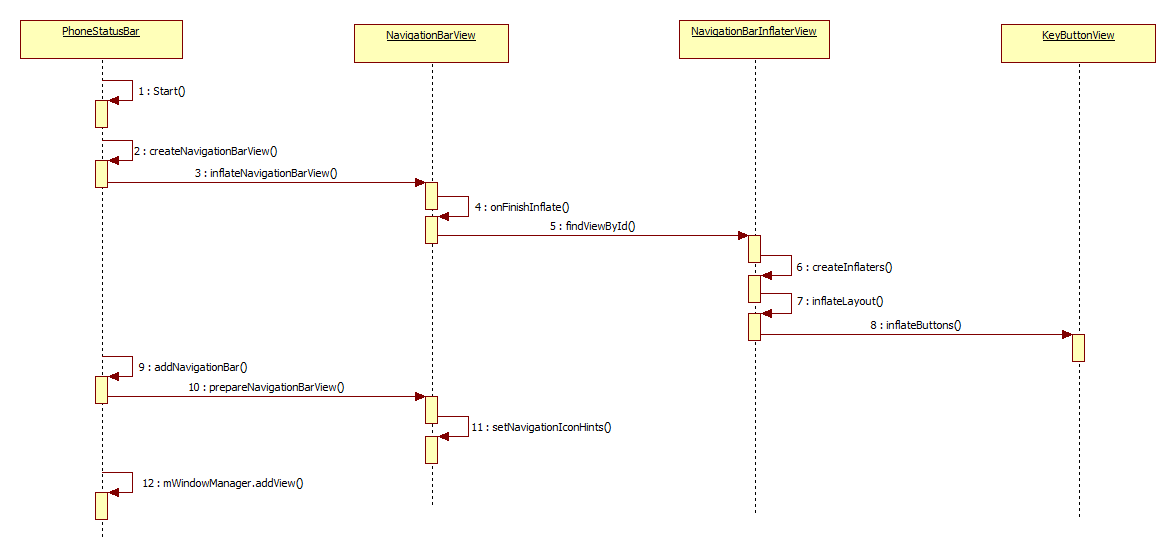
下面总结一下导航栏的控件树及其加载过程。
整体控件树如下:
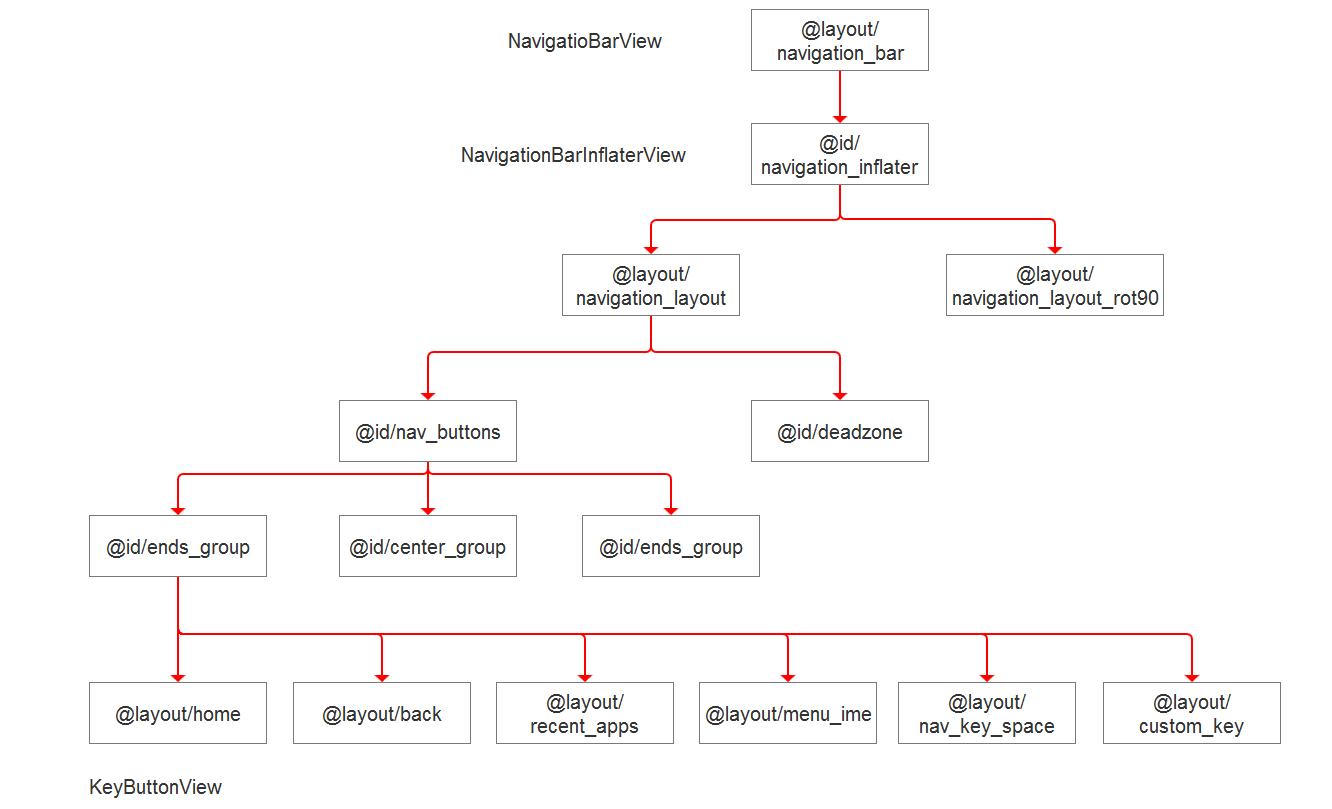
加载过程如下: