systemUI为用户提供系统级别的信息显示与交互,如顶端的状态栏、底部的导航栏、最近任务列表等。systemui是以APK的形式存在系统,所以也是通过Activity、Service、BroadcastReceiver接受外界的请求及执行相关的操作。比较特殊的是状态栏、导航栏等组件的启动方式,他们需要在显示UI的时候不中断原来的Activity(播放视频、玩游戏等),所以其导航栏和状态栏是运行于一个叫SystemUIService的Service中。
下面就来看SystemUI的启动过程,首先来看SystemUI的AndroidManifest.xml的定义:
    <application
        android:name=".SystemUIApplication"
        android:persistent="true"
        android:allowClearUserData="false"
        android:allowBackup="false"
        android:hardwareAccelerated="true"
        android:label="@string/app_label"
        android:icon="@drawable/icon"
        android:process="com.android.systemui"
        android:supportsRtl="true"
        android:theme="@style/systemui_theme"
        android:defaultToDeviceProtectedStorage="true"
        android:directBootAware="true">
        <!-- Keep theme in sync with SystemUIApplication.onCreate().
             Setting the theme on the application does not affect views inflated by services.
             The application theme is set again from onCreate to take effect for those views. -->

        <!-- Broadcast receiver that gets the broadcast at boot time and starts
             up everything else.
             TODO: Should have an android:permission attribute
             -->
        <service android:name="SystemUIService"
            android:exported="true"
            />
可以看到,systemUI自定义了一个Application——SystemUIApplication,同时注册了一个SystemUIService,首先来看SystemUIService是怎么启动的:
ActivityManagerService.systemReady
    -》SystemServer.startSystemUi
        -》SystemUIService.onCreate
            -》SystemUIApplication.startServicesIfNeeded
                -》mServices[i].start()&mServicesStarted = true

SystemUIApplication.onCreate
    ->ACTION_BOOT_COMPLETED&mServicesStarted
        ->mServices[i].onBootCompleted
在system ready后会通过startServicesIfNeeded启动各个service,需要注意的是,systemUI只有一个主线程,所以这些服务都是线性启动的,且在未启动完成,在其他地方调用该startServicesIfNeeded,会被阻塞不会执行。
在boot完成以后,则会调用各个service的onBootCompleted函数。其中包含的servic类定义在SERVICES数组中,这些类都继承于抽象类SystemUI,其定义了start、onConfigurationChanged、dump、onBootCompleted、getComponent和putComponent方法。
这里的Service和平时所讲的四大组件Service不一样,只是继承了SystemUI类的普通对象而已。 getComponent和putComponent方法用于方便的获取和调用对应服务的接口函数
来看定义了多少service:
private final Class<?>[] SERVICES = new Class[] {
        com.android.systemui.tuner.TunerService.class,//定制状态栏服务
        com.android.systemui.keyguard.KeyguardViewMediator.class,//锁屏相关
        com.android.systemui.recents.Recents.class,//近期任务
        com.android.systemui.volume.VolumeUI.class,//音量条
        com.android.systemui.statusbar.SystemBars.class,//状态栏
        com.android.systemui.usb.StorageNotification.class,//通知栏
        com.android.systemui.power.PowerUI.class,//电源相关
        com.android.systemui.media.RingtonePlayer.class,//铃声播放相关
};
和StatusBar相关的为SystemBars类,我们来分析该服务的启动,首先来看Start函数:
    @Override
    public void start() {
        if (DEBUG) Log.d(TAG, "start");
        mServiceMonitor = new ServiceMonitor(TAG, DEBUG,
                mContext, Settings.Secure.BAR_SERVICE_COMPONENT, this);
        mServiceMonitor.start();  // will call onNoService if no remote service is found
        putComponent(SystemBars.class, this);
    }
可以看到调用的是ServiceMonitor的Start方法,ServiceMOnitor是一个监听Settings.Secure.BAR_SERVICE_COMPONENT是否改变的类,在start中通过监听系统应用的变化来启动服务。主要的参数为最后两个,分别为settingKey和callbacks,即Settings.Secure.BAR_SERVICE_COMPONENT——bar_service_component和this——SystemBars。然后调用start()函数,在该函数中其发送了一个MSG_START_SERVICE消息,在Handler中处理该消息,调用startService()函数,在该函数中,通过getComponentNameFromSetting函数获取前面定义的setting中的mSettingKey的值,此处应该不存在,所以返回null,所以调用mCallbacks.onNoService()回调函数,即SystemBars中的onNoService,其调用的是createStatusBarFromConfig:
private void createStatusBarFromConfig() {

        //config_statusBarComponent就是PhoneStatusBar
        final String clsName = mContext.getString(R.string.config_statusBarComponent);

        Class<?> cls = null;
        try {
            cls = mContext.getClassLoader().loadClass(clsName);
        } catch (Throwable t) {
            throw andLog("Error loading status bar component: " + clsName, t);
        }
        try {
            //创建BaseStatusBar实例
            mStatusBar = (BaseStatusBar) cls.newInstance();
        } catch (Throwable t) {
            throw andLog("Error creating status bar component: " + clsName, t);
        }
        mStatusBar.mContext = mContext;
        mStatusBar.mComponents = mComponents;
        //启动
        mStatusBar.start();

    }
在createStatusBarFromConfig方法里会获取一个config_statusBarComponent的字符串值,这个值就是PhoneStatusBar的clasName,所以这里的mStatusBar是PhoneStatusBar实例,执行PhoneStatusBar的start方法:
@Override
    public void start() {
        //获取WindowManager,初始化当前显示界面大小
        mDisplay = ((WindowManager)mContext.getSystemService(Context.WINDOW_SERVICE))
                .getDefaultDisplay();
        updateDisplaySize();
        //src绘图模式
        mScrimSrcModeEnabled = mContext.getResources().getBoolean(
                R.bool.config_status_bar_scrim_behind_use_src);
        //调用父类start方法
        super.start(); // calls createAndAddWindows()
        //MediaSession相关
        mMediaSessionManager
                = (MediaSessionManager) mContext.getSystemService(Context.MEDIA_SESSION_SERVICE);
        // TODO: use MediaSessionManager.SessionListener to hook us up to future updates
        // in session state
        //添加导航栏
        addNavigationBar();

        // Lastly, call to the icon policy to install/update all the icons.
        //更新状态栏图标
        mIconPolicy = new PhoneStatusBarPolicy(mContext, mCastController, mHotspotController,
                mUserInfoController, mBluetoothController);
        mIconPolicy.setCurrentUserSetup(mUserSetup);
        mSettingsObserver.onChange(false); // set up

        mHeadsUpObserver.onChange(true); // set up
        if (ENABLE_HEADS_UP) {
            mContext.getContentResolver().registerContentObserver(
                    Settings.Global.getUriFor(Settings.Global.HEADS_UP_NOTIFICATIONS_ENABLED), true,
                    mHeadsUpObserver);
            mContext.getContentResolver().registerContentObserver(
                    Settings.Global.getUriFor(SETTING_HEADS_UP_TICKER), true,
                    mHeadsUpObserver);
        }
        mUnlockMethodCache = UnlockMethodCache.getInstance(mContext);
        mUnlockMethodCache.addListener(this);
        //锁屏
        startKeyguard();

        mDozeServiceHost = new DozeServiceHost();
        KeyguardUpdateMonitor.getInstance(mContext).registerCallback(mDozeServiceHost);
        putComponent(DozeHost.class, mDozeServiceHost);
        putComponent(PhoneStatusBar.class, this);

        /// M:add for multi window @{
        if(MultiWindowProxy.isSupported()) {
            registerMWProxyAgain();
        }
        /// @}
        setControllerUsers();

        notifyUserAboutHiddenNotifications();

        mScreenPinningRequest = new ScreenPinningRequest(mContext);
    }
再次回调父类BaseStatusBar 的start方法,在这个方法中实例了许多systemui常用的对象、服务、Manager、Observer等,但其中最重要的函数是createAndAddWindows:
public void start() {

    ......

    /*实例化IStatusBarService,
    随后BaseStatusBar将自己注册到IStatusBarService之中。以此声明本实例才是状态栏的真正实现者,IStatusBarService会将其所接受到的请求转发给本实例。
    IStatusBarService会保存SystemUi的状态信息,避免SystemUi崩溃而造成信息的丢失
    */
        mBarService = IStatusBarService.Stub.asInterface(
                ServiceManager.getService(Context.STATUS_BAR_SERVICE));

        ......

        //IStatusBarService与BaseStatusBar进行通信的桥梁。
        mCommandQueue = new CommandQueue(this);

     /*switches则存储了一些杂项:禁用功能列表,SystemUIVisiblity,是否在导航栏中显示虚拟的菜单键,输入法窗口是否可见、输入法窗口是否消费BACK键、是否接入了实体键盘、实体键盘是否被启用。
        */
        int[] switches = new int[9];

        ArrayList<IBinder> binders = new ArrayList<IBinder>();

        /*它保存了用于显示在状态栏的系统状态
        区中的状态图标列表。在完成注册之后,IStatusBarService将会在其中填充两个数组,一个字符串
        数组用于表示状态的名称,一个StatusBarIcon类型的数组用于存储需要显示的图标资源。
        */

        ArrayList<String> iconSlots = new ArrayList<>();
        ArrayList<StatusBarIcon> icons = new ArrayList<>();

        Rect fullscreenStackBounds = new Rect();
        Rect dockedStackBounds = new Rect();

    //IStatusBarService注册一些信息
    try {
            mBarService.registerStatusBar(mCommandQueue, iconSlots, icons, switches, binders,
                    fullscreenStackBounds, dockedStackBounds);
        } catch (RemoteException ex) {

        }

        //创建状态栏窗口
        createAndAddWindows();

        ......
        }
    ......
    }
父类中createAndAddWindows为抽象函数,真正实现是在子类PhoneStatusBar中,该函数里面直接调用addStatusBarWindow:
    private void addStatusBarWindow() {
        makeStatusBarView();
        mStatusBarWindowManager = new StatusBarWindowManager(mContext);
        mRemoteInputController = new RemoteInputController(mStatusBarWindowManager,
                mHeadsUpManager);
        mStatusBarWindowManager.add(mStatusBarWindow, getStatusBarHeight());
    }
主要分析的函数为makeStatusBarView,该函数就是我们整个Statusbar的布局控件加载函数,里面的代码非常多,这里就不一一贴出来,其中主要是如下 inflateStatusBarWindow(context)加载布局:
protected void inflateStatusBarWindow(Context context) {
        mStatusBarWindow = (StatusBarWindowView) View.inflate(context, R.layout.super_status_bar, null);
}
super_status_bar就是整个statusbar的根布局,对应的是StatusBarWindowView这个自定义布局。
到这里就大致将SystemUI statusbar的初始化加载过程过了一遍,,总结一下和SystemUI启动相关的类,如下类图:
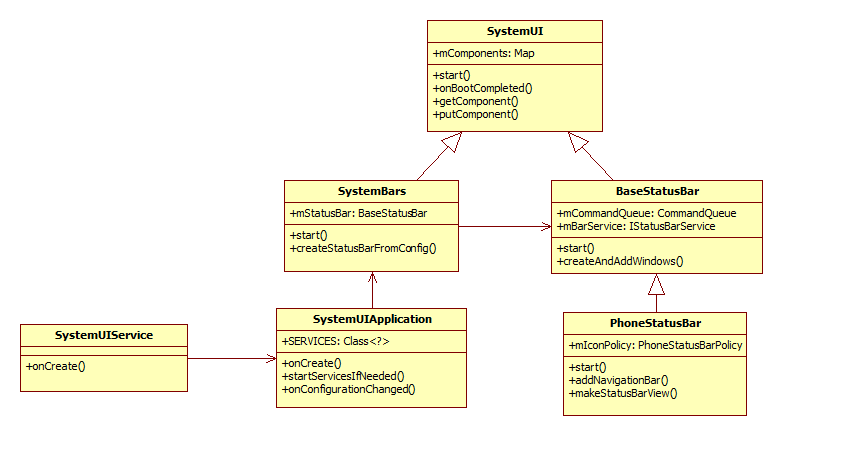
其中SystemUIService为SystemUI暴露给外界的Service,主要让SystemSever可通过启动这个Service来启动SystemUI。SystemUIApplication为SystemUI的程序入口,是自定义的Application,其里面主要包含了一些列继承于SystemUI的类。SystemUI是一个抽象类,主要定义了Start、onBootCompleted等方法,对于继承于systemUI的类,我们则可认为是SystemUI中定义的Service类。其中和StatusBar相关的类就是SystemBars。在SystemBar中,有一个关键变量为BaseStatusBar,这个类也是继承于SystemUI,其主要就是StatusBar的加载Service,状态栏对应有TV版和Phone版,PhoneStatusBar就是Phone的实现。PhoneStatusBar继承于BaseStatusBar,实现和重写了里面定义的很多方法。
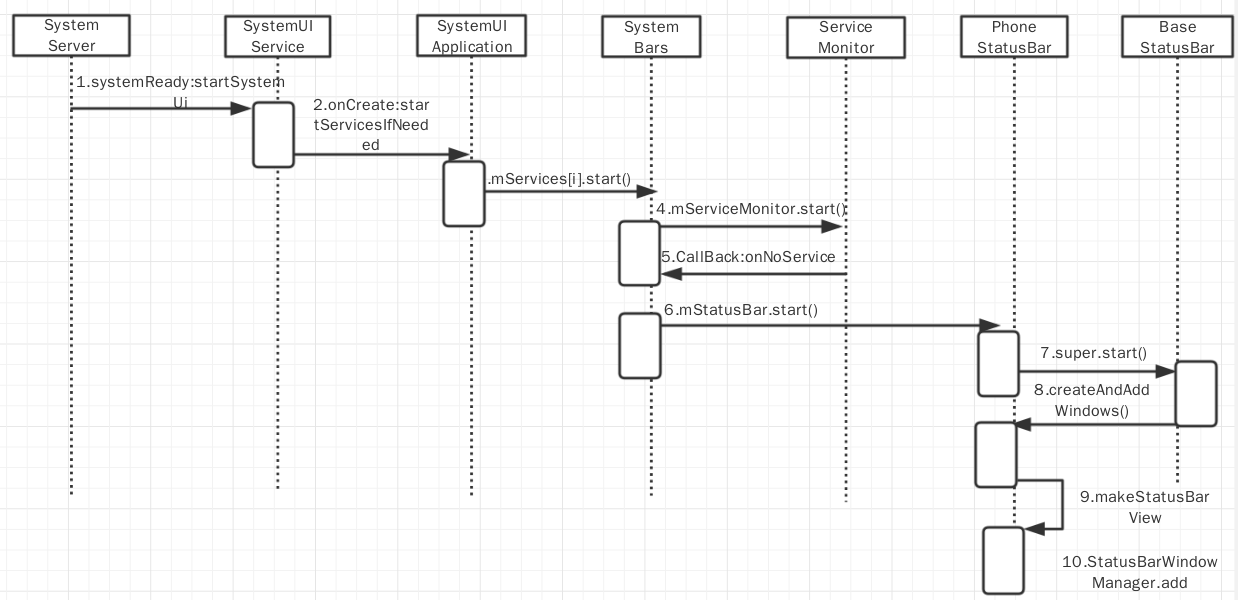
下面是一个UML时序图: